For the longest time, I thought that reattaching the soles of shoes was taking “being thrifty” to an absurd level. And then my 2-year-old son grew into a 3-year-old running maniac, and everything changed. Not only is he capable of literally tearing off the sole from his shoes in less than a month since we bought them, but he is also very passionate about his shoes and will ask to wear them even if they are in pieces.
And then there are those high-quality leather shoes where the tread might wear thin, but with care the rest of the shoe can see another 20 years. For those, and for the children’s shoes, I thought I would write a short post about how to reattach the sole of a shoe!
How Do You Reattach the Sole of a Shoe?
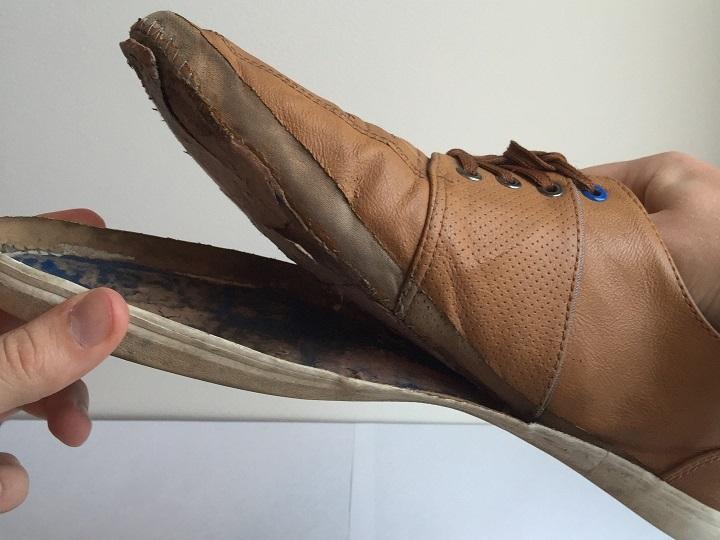
There are 2 ways to reattach the sole of a shoe: gluing or sewing. In order to glue the sole of a shoe, you need to clean both sides thoroughly, apply the glue, let it rest for 30 minutes and then attach the sole back to the shoe. If you are planning to sew it, you should still start by gluing it and then using an awl to sew the shoes before the glue has completely set. The process is fairly simple but requires that you pay attention to a couple of details that I will further elaborate on below.
Should You Try to Reattach the Sole Yourself?
The most common question about reattaching the sole of a shoe has nothing to do with shoes, but if it is something you should try by yourself at home. In my experience, the process is fairly straight forward and is not that difficult. If you are planning to rely just on gluing the shoes than it really is as simple as you would imagine. The only dangers are that you would use too much glue and it would spill out when you bring the two sides together.
The real danger with sewing your shoes is that you would prick your hand or finger. The leather is really though and so is the sole of the shoe, which is why people tend to push in harder than they should and then they get stung. There is also the danger that you will get tired and start cutting corners. You need to be very careful and methodical when sewing shoes.
If you are actually replacing the string that had already been used from the factory, take your time and really use all the wholes that were punched through in the initial process. Skimping out on a hole or two will not really affect the strength of the stitching, but it will shoe like a sore thumb later on.
Lastly, I should say that asking a cobbler for help is nothing to be ashamed of. I usually reserve calling on the services of a specialist for shoes that I really care about.
It is not that I don’t have the patience to be very methodical and get a really nice finish, but I just want the peace of mind to know that I have done everything humanly possible for my favorite shoes. In fact, I took my shoes to a cobbler only once and they were the shoes I got married in, so they had a lot of sentimental value.
How Do You Glue the Sole of a Shoe?
There are different types of glue for shoes on the market today, and I have actually written a review post talking about the options you have today, but, long story short, the solution I would use is called Weldwood Contact Cement.
Weldwood Contact Cement
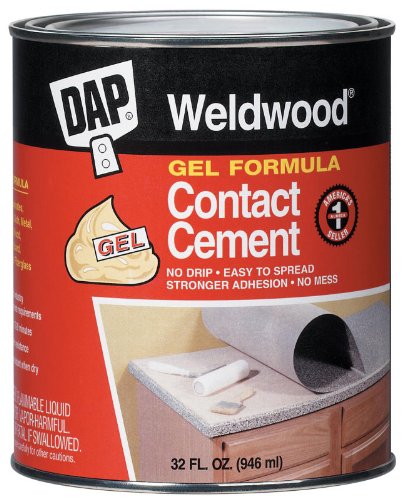
It is not specifically designed to be used on shoes, but it dries flexible and it is stronger than most types of shoe specific glue. However, the process of using it is what I love the most.
- Start by peeling back as much of the sole as you can. That does not mean actually forcing the sole off with a set of pliers. But, if the glue is dry or rotted enough that you can just pull and the sole comes off, just remove as much of it as you can.
- Use 800 grit sandpaper to remove any debris, including any of the leftover glue.
- Apply the contact cement or your glue of choice on both sides, the sole and the shoe it is supposed to be glued to.
- Depending on the shoe glue you are using, you might have to go ahead and skip this step, but for the Contact Cement, you need to wait until the glue does not feel sticky to touch, which will be about 30 minutes.
- Bring the two sides together and make sure to squeeze out any air bubbles. Note that you do not need to keep pressing them together while the glue dries. Just give the glue the 24 hours it needs to cure completely.
How Do You Sew the Sole of a Shoe?
Technically you do not need to glue a sole that you are planning to sew, but I like to do it for several reasons. First, you are sealing out water much better if you are using glue than with simple sewing.
Secondly, the glue holds the two pieces together much easier, and, provided you have aligned the whole from the previous sewing, your needles should go through much easier.
Finally, when sewing by hand you are probably not going to be able to match the pressure strength of the machine sewn shoes, so the glue helps hold the sole and the shoe stays together.
- Start a few stitches above of where the original stitching was torn, and draw in a shoe stitching line through the hole. I like to use the hook part on an awl to just pull the thread through. Make sure to pull the thread through to its halfway point, so you should have equal lengths of thread on both sides of the hole.
- Use the awl or a needle to bring one end of the string through the next hole and do the same with the other end. It should feel like you are doing a simple hair braid where the sides of the string keep moving from one side of the shoe to the other.
- Finish a few stitches above the original tear and just cut the string as close to the shoe as possible.
- As a final, optional step, I like to drip just a little bit of glue on top of the ends of the thread. The stitching itself should keep them in place but I prefer to do it that way.